Tuesday, October 27, 2015

WiPy on the home network

Recently there was a Kickstarter about "an Arduino that runs Python", the WiPy. This is a small IoT board with WiFi on it (which is not available on stock Arduinos) for an attractive price. And being able to use a high level language along with a lot of existing libraries makes it attractive too.

A few days ago I got the WiPys that I backed and the first obstacle to get the running was the power supply as they do not have a (micro) USB connector on board (and I also did not back the extension boards they offered).

Luckily I still had an old defunct USB hub from which I could solder out the connector and put it on a small PCB for this purpose (while doing that exercise I also found out that the 5V of the USB port are allowed to be 4.75-5.25V and on the end of a hub even being as low as 4.4V).

WiPy on BreadBoard
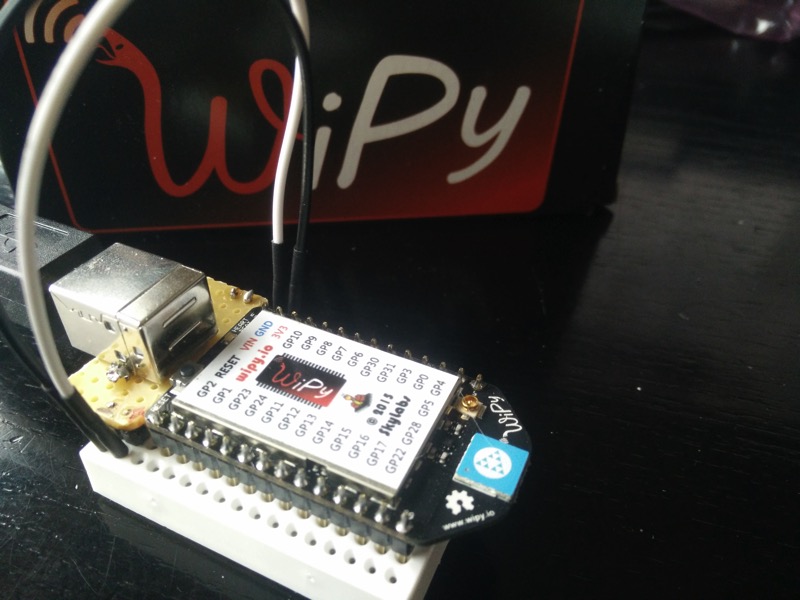
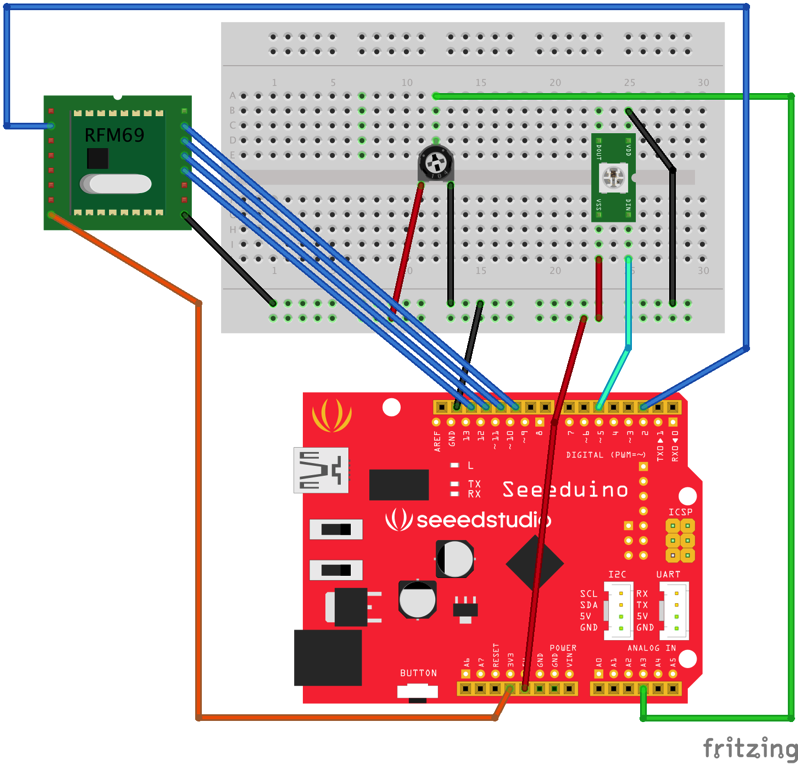
WiPy on Breadboard with USB power supply connector.

Now that the WiPy is on the breadboard, I set up my computer to scan for the WLAN of the WiPy and then telneted into the device. I poked around and tried to inspect the WLAN settings as described in the manual:

>>> from network import WLAN
>>> wlan = WLAN() # we call the constructor without params

This immediately made the connection drop. It turned out I needed to first update the firmware to the latest version (v1.1 at time of the writing), which was painless (but a bit confusing, as they also supply a bootloader.bin, that is not needed).

After the firmware upgrade the above worked and I tried to change the device to talk to my home network. The caveat here is that at the moment you issue

wlan.init(WLAN.STA)

to put the machine into station mode (default is being an access point), the connection drops. Some users have solved that by connecting via UART and serial line, but I did not really want to go that route.

Instead I edited boot.py on my local computer and then uploaded it via ftp into /flash. I found out, that if you don't terminate the ftp client and have a telnet connection open as well, I could easily (syntax) check the uploaded file by pressing Ctrl-D in the terminal:

MicroPython v1.5-1-ge954604 on 2015-10-21; WiPy with CC3200
Type "help()" for more information.
>>>    <control-D>   <-- here
PYB: soft reboot
Traceback (most recent call last):
  File "boot.py", line 17, in 
NameError: name not defined

The WiPy tells me that there is an error in my file, so I edit it locally and upload it again via the ftp connection. And only at the end when the WiPy is happy, I press the hard-reset button.

Now for reference my boot.by that worked for me:

from network import WLAN

SSID = 'home_SSID'         # SSID of your home network
AUTH = (WLAN.WPA2, 'very_secret') # WPA secret as 2nd param
IP = '10.1.2.42'           # Fixed IP the device should get
ROUTER = '10.1.2.3'        # IP of your router
DNS = '10.1.2.3'           # IP of your DNS server
NETMASK = '255.255.255.0'  # Netmask to use

import machine

wlan = WLAN()

if machine.reset_cause() != machine.SOFT_RESET:
    wlan.init(WLAN.STA)
    # configuration below MUST match your home router settings!!
    wlan.ifconfig(config=(IP, NETMASK, ROUTER, DNS))

if not wlan.isconnected():
   wlan.connect(ssid=SSID, auth=AUTH, timeout=5000)
   while not wlan.isconnected():
      machine.idle() # save power while waiting
   print('WLAN connection succeeded!')
Parts of that script were taken from the WiPy WLAN tutorial and this WiPy Forum post.

Tuesday, October 06, 2015

Driving a Servo on Arduino from a remote Arduino over secured radio

In Stuttgart, there is now a Hackergarden Meetup group that tinkers with whatever the people showing up want to tinker with.

In the 1st edition I was doing some hacking on Arduino where two Arduinos were transmitting data over an encrypted radio via a RFM69 radio chip. This setup is described on the Codecentric blog.

Now in the 2nd edition we wanted to build on this and control a servo motor on one Arduino remote from the other one. This video shows the end result:

On the left you see a potentiometer, that is read out and the value is then shown on the Neopixel ring. The value is also transmitted via RFM69 chip to the other Arduino that has the receiver and which then drives the servo.

The setup on the server side looks like this:

Poti data sender Steckplatine

On the receiver side we used a "normal" setup like the one described on the before mentioned report. We had an issue for a while, as the servo was on a port that was also used by the RFM69 code, but once we fixed that, it worked.

The client side code is in my GitHub fork of the Hackergarden repository - I hope it will be merged soon :)

Sunday, August 09, 2015

mBot and Lego

Recently I got my Kickstarter-backed mBots from Makeblock, some cute little robots with basically an Arduino-brain.

And as the Kickstarter campaign was successful, I also got one of the nice LED-Matrix displays with it.

Now I wanted to mount the display on the front like they show on some pictures and the range sensor as well. Obviously that does not work as they go into the same place. Unfortunately there was no additional mounting bracket supplied.

Next try was to mount it at the back, but there are no mounting holes with (or without) thread available. Luckily we have a larger Lego collection and the website claims The chassis is compatible with Lego&Makeblock parts. Unfortunately this is not entirely true, as the holes in the mBot chassis are just a bit too small for the normal lego connector pegs or axles.

But don't fear :-)

First, with some M4 screws and nuts it is easy to just mount lego parts with the help of those:

IMG 20150809 125521

And luckily Lego also supports being mounted with M3 screws and nuts, so I basically created an adapter with some Lego Technic parts:

IMG 20150809 145058~2

And finally I was able to mount the display at the back of my mBot:

IMG 20150809 151116~2

I saw an image on the forums where someone mounted the display (for my gusto upside down) and the range sensor on top, but I think this way the sensor may be too high up and not find all obstacles.

Tuesday, July 07, 2015

Running OkHttpClient from within WildFly 9 (subsystem)

A few days ago WildFly 9 was released and one of the highlight for sure is the support of HTTP/2.0 in the Undertow web subsystem. As Hawkular has recently moved to use WildFly 9 (from 8.2) as its underlying server, it was sort of natural to try to use http2 for connections from the Hawkular-Wildfly-Monitor client to the server.

One peculiarity here is that in my case the monitor client is running inside the Hawkular server, but at the end it does not matter if it is running inside a standalone WildFly server or inside the Hawkular server.

The setup

Greg Autric has written a blog post, that shows how to set up Http2 in WildFly with the offline CLI, which also works well in the Hawkular case. As the question came up: that setup also includes the https setup inside WildFly.

The only thing that is a bit problematic in the post is that setting JAVA_OPTS before starting the server will ignore all the settings from standalone.conf, which in the current Hawkular version will prevent a correct start of the bus broker (because the IPv4Only flag is lost).

So in my opinion it is better to modify standalone.conf to *add* those options to the other options that are already there:

  JAVA_OPTS="-Xms64m -Xmx512m -XX:MaxPermSize=256m -Djava.net.preferIPv4Stack=true"
  JAVA_OPTS="$JAVA_OPTS -Xbootclasspath/p:/opt/hawkular-1.0.0.Alpha3-SNAPSHOT/alpn-boot-8.1.3.v20150130.jar"
  JAVA_OPTS="$JAVA_OPTS -Djboss.modules.system.pkgs=$JBOSS_MODULES_SYSTEM_PKGS -Djava.awt.headless=true"

Now when I start the Hawkular server and try to connect with FireFox on the https port, I get the warning about the self signed certificate, but can connect and get the UI over a Http2 connection as described in Greg's post.

Running the OkHttpClient

As said before, the WildFly monitor client is a subsystem inside the WildFly server. I wrote a bit of client code, that is running in the subsystem (shortened):

   OkHttpClient httpClient;
   httpClient = new OkHttpClient();

   // DO NOT USE IN PRODUCTION, allow all hostnames
   httpClient.setHostnameVerifier(new NullHostNameVerifier());

   setKeystore(httpClient); // Use custom ssl factory

   String uri = "https://...:8443/";

   Request request = new Request.Builder()
            .url(uri)
            .addHeader("Accept", "application/json")
            .get()
            .build();

   // sync execution just for the post
   Response resp = httpClient.newCall(request).execute();
   System.out.println(resp.toString());

Fail?

This code works well except for the fact that is always uses Http(s)/1.1 and never Http2 as you can see from the output of the last println statement:

  Response{protocol=http/1.1, code=204, message=....}
I was playing around with various options up to a point where I thought, I have to extract the code to a standalone Java SE class to better debug it in isolation.

I wrote the class, set the bootclasspath, ran it and it worked perfectly:

  Response{protocol=h2, code=204, message=....}

So what is the difference? I removed the bootclasspath setting for ALPN, reran and the connection fell back to http/1.1.

Which is kinda strange as my client subsystem is running inside the very same WilFly server, that is running Undertow and which is able to serve http2 requests and where I added the ALPN classes through JAVA_OPTS earlier.

Now remember that WildFly is using their own classloader system (jboss-modules), which is pretty powerful in isolating deployments and classes and restricting their visibility and/or leakage into areas where they should (not) be seen.

And this in fact is what happened here as well.

Success!

So I had to explicitly add the ALPN classes to my module.xml file for the monitoring client subsystem:

  <module xmlns="urn:jboss:module:1.3" name="${moduleName}">
    <resources>
      <resource-root path="clients-common.jar"/>
      [...]
      <resource-root path="okhttp.jar"/>
      <resource-root path="okio.jar"/>
    </resources>
    <dependencies>
      <!-- modules required by any subsystem -->
      <module name="javax.api"/>
      [...]
      <system export="true">
        <paths>
          <!-- Needed for HTTP2 and SPDY support-->
          <path name="org/eclipse/jetty/alpn"/>
        </paths>
      </system>
    </dependencies>
  </module>

From the above snippet, you can see that the okhttp and okio jars are packaged in the module and are made available to my client code as well.

Now that the module.xml has been adjusted, as is well and my subsystem is using Http2 :-)

Wednesday, May 13, 2015

Scripts with multiple actions in Textual5

Some may know Textual as a powerful IRC client on the Mac.

One of the interesting parts (to me) is that Textual allows to extend it via Scripts, that can be written in AppleScript or other scripting languages.

They have an introuction to write Scripts, which I've used to create some simple scripts.

What I always wanted to do it to have scripts that can do multiple things like


/away Gone fishing
/msg I'am out of here
/leave

To set myself into away mode, put a message in the channel and then leave it.

Unfortunately, this seemed impossible.

Yesterday I finally emailed their support and got an answer back that this is pretty simple: just put each command on a new line.

So a potential script could look like this:


on textualcmd(inputData, destinationChannel)

return "
/away Gone for the night
/nick zzZZzz
"
end textualcmd

to set may away mode and also change my nick. It is important to put each of the
command on the very first column of the line, as Textual does not remove leading spaces.

Two helpful links: Textual Command reference, list of IRC commands on Wikipedia.

UPDATE: the "WritingScripts" article meanwhile got updated to better reflect above use case.

Monday, February 23, 2015

Little extension board for the PI

Long time ago I've started creating a small extension board for the RaspberryPI to get some physical world into hacking.

Img of installed and running board
Board installed and running on the PI.

The first iteration was on a bread board with some wiring, then for the next iteration I took a stripe PCB and wired it there. Worked but was not pretty:

Prototype board

Anyway, as the concept worked out, I decided I need some printed circuits. I played around with some options, but nothing was really cool for hobbyists (and I did not want to manufacture them my self with all the chemicals needed). And then I found Fritzing, which was exactly right.

Not only does Fritzing produce boards, but it also a nice graphical editor application that can be used to create a schematic, assign parts from a large part library, (auto) route the schematic and send the result to production

Fritzing editor with PCB layout
Fritzing editor with routed PCB in both side view

After I created the layout etc. I sent the design to the Fritzing fab and got by PCBs back after around a week of round trip time.

Yesterday I now sat down with the PCB, some needed parts and my soldering iron and assembled the parts

Parts and PCB
The parts
After soldering the low profile parts
Low profile parts soldered in
Most parts soldered
Assembled

In the last image there was still the thermo sensor missing, as well as the 4th LED.

Now when that board is put on to the extension header of the PI (inner row, that is closer to the CPU, the following little shell script will light all LEDs and then display the current temperature every second


#!/bin/sh
set -x
cd /sys/class/gpio
for i in 10 22 27
do
echo $i > export
sleep 5
echo out > gpio$i/direction
sleep 5
echo 1 > gpio$i/value
done

cd /sys/bus/w1/devices/10-*
while true
do
cat w1_slave | grep t=
sleep 60
done

There is one line that may need tailoring depending on the variant of DS1820 thermometer chip you have


cd /sys/bus/w1/devices/10-*

One thing where I am not yet sure is if the DS1820 actually needs the phantom power. In an older experiment with the chip, I did not connect pin 3 at all. I think this additional power may even heat the thermometer chip, as the values that I currently get a are some 5-6 degrees too high.

To read the state of the push button you can use this script


cd /sys/class/gpio
echo 9 > export
cd gpio9
while true ; do cat value; done

If you are interested about more details of the board, you can look at this Fritzing page, where I've uploaded the .fzz file.

And if you are using RHQ, you can look at this agent plugin to use the LEDs and the thermometer chip from within RHQ.


Friday, February 06, 2015

Meet the Hawk!

Well, actually that is not Hawk, but HAWKULAR

Hawkular
(Non-official visualization)

Hawkular is the next generation monitoring (and management) project from JBoss incorporating the best features and knowledge from RHQ while at the same time improving on the less strong parts.

Hawkular is composed of a number of individual sub-projects that work together and deliver individual services. The design of those services is in a way that they could also be used standalone in other projects.

The currently most prominent sub-project is Hawkular Metrics, which you probably recall as "RHQ Metrics" and which just has released its version 0.2.7 under the old name. There is also an OpenShift cartridge available for it.

Other sub-projects are:

  • Hawkular-bus: asynchronous bus to connect the various parts. This is a message oriented bus currently running on Active MQ and providing an infrastructure for other projects to re-use.
  • Hawkular-alerts: alerting on incoming metrics (and other events).
  • Hawkular-ui-components: ui components such as Hawt.io 2 plugins and Angular directives that make up the Hawkular Console
  • Hawkular build tools: Helpers and definitions to build Hawkular

Similarly the

  • Wildfly-cassandra extension (run Cassandra 3 as an extension inside WildFly)
  • Wildfly-monitor extension (Monitor WildFly metrics and forward to a Hawkular Metrics instance)

have also been moved over to the Hawkular organization on GitHub

All the pieces are / will be assembled in the Hawkular project

All projects and sub-projects live in GitHub under the Hawkular organization. Right now we have set up the basic projects and other infrastructure. The overall issue tracker is setup at Jboss.org with individual trackers for the sub-projects (you can use the overall tracker and we dispatch).

Right now we are working on getting an end-to-end workflow and integration done for Hawkular.

Development discussions around Hawkular happen on the Hawkular-dev mailing list and you can find the developers hanging around on IRC at irc://irc.freenode.net/#hawkular.

And make sure to follow Hawkular on Twitter